AZ-104: Microsoft Azure Administrator
You have an Azure subscription that contains the Azure virtual machines shown in the following table.

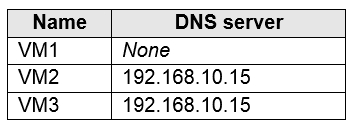
You configure the network interfaces of the virtual machines to use the settings shown in the following table.
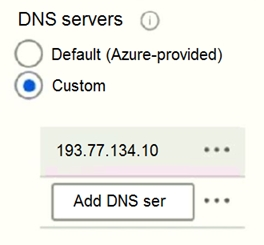
From the settings of VNET1 you configure the DNS servers shown in the following exhibit.
The virtual machines can successfully connect to the DNS server that has an IP address of 192.168.10.15 and the DNS server that has an IP address of 193.77.134.10.
For each of the following statements, select Yes if the statement is true. Otherwise, select No.
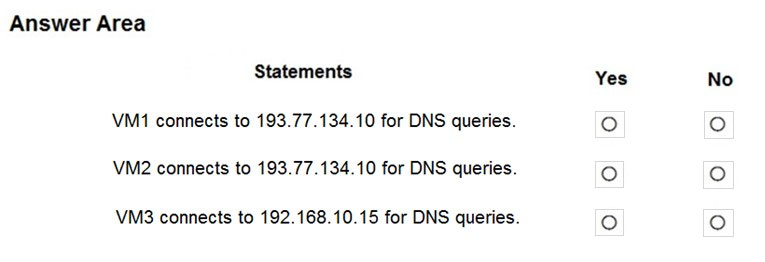
NIC configured DNS servers takes precedence over VNET configured DNS servers.
Box 1: Yes
VM1 uses the VNET configured DNS 193.77.134.10.
You can specify DNS server IP addresses in the VNet settings. The setting is applied as the default DNS server(s) for all VMs in the VNet.
The DNS is set on the VNET level.
Box 2: No
VM2 uses the NIC configured DNS 192.168.10.15.
You can set DNS servers per VM or cloud service to override the default network settings.
This VM has 192.168.10.5 set as DNS server, so it overrides the default DNS set on VNET1.
Box 3: Yes
VM3 uses the NIC configured DNS 192.168.10.15
You can set DNS servers per VM or cloud service to override the default network settings.
This VM has 192.168.10.5 set as DNS server, so it overrides the default DNS set on VNET1.
Reference:
https://docs.microsoft.com/en-us/azure/virtual-network/virtual-networks-faq#name-resolution-dns
You manage two Azure subscriptions named Subscription1 and Subscription2.
Subscription1 has following virtual networks:

The virtual networks contain the following subnets:

Subscription2 contains the following virtual network:
- Name: VNETA
- Address space: 10.10.128.0/17
- Location: Canada Central
VNETA contains the following subnets:

For each of the following statements, select Yes if the statement is true. Otherwise, select No.
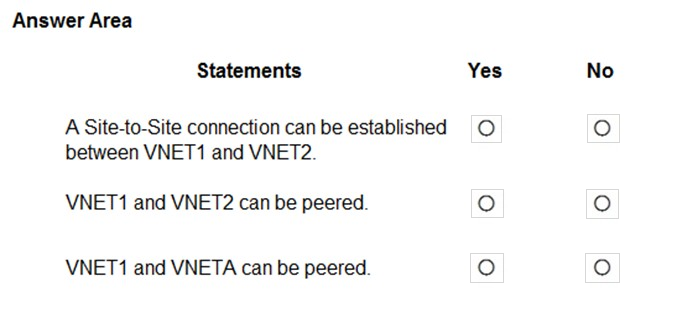
VNET1: 10.10.10.0 - 10.10.10.255 VNET2: 172.16.0.0 - 172.16.255.255 VNETA: 10.10.128.0 - 10.10.255.255 Box 1: No
To create a VNet to VNet VPN you need to have a special Gateway Subnet. Here, the VNet has no sufficient address space to create a Gateway Subnet and thus to establish a VNet to VNet VPN connection.
Box 2: Yes
For VNet peering the only consideration is that the VNets do not overlap. VNET1 and VNET2 do not overlap.
Box 3: Yes
For VNet peering the only consideration is that the VNets do not overlap. VNET1 and VNETA do not overlap.
Reference:
https://azure.microsoft.com/en-us/blog/vnet-to-vnet-connecting-virtual-networks-in-azure-across-different-regions/
https://docs.microsoft.com/en-us/azure/virtual-network/virtual-network-manage-peering#requirements-and-constraints
You have an Azure subscription that contains an Azure Storage account named storageaccount1.
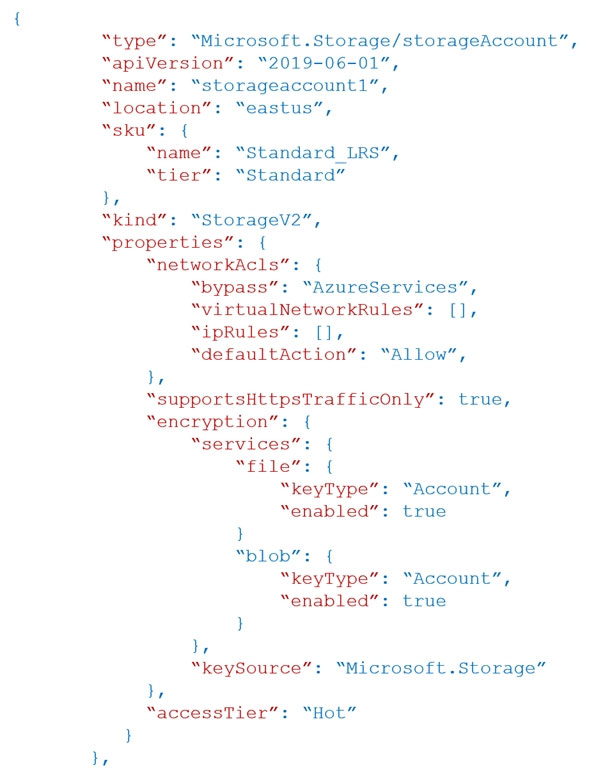
You export storageaccount1 as an Azure Resource Manager template. The template contains the following sections.
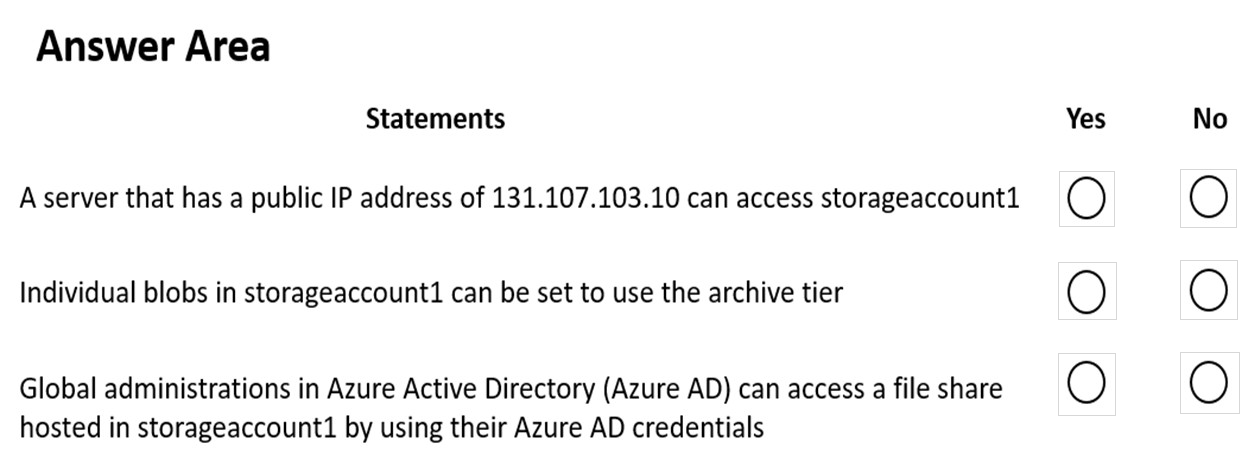
For each of the following statements, select Yes if the statement is true. Otherwise, select No.
Check the answer section
Box 1 - Yes. VirtualNetworkRules & IpRules are blank, with the default action Allow.
Box 2 - Yes. Individual blobs can be set to the archive tier.
Box 3 - No. File shares allow access using the Azure AD account as long you have AD DS (on-prem with Azure AD Sync or AAD DS).
Reference:
https://docs.microsoft.com/en-us/azure/storage/blobs/access-tiers-overview
https://docs.microsoft.com/en-us/azure/storage/blobs/assign-azure-role-data-access?tabs=portal
https://docs.microsoft.com/en-us/azure/templates/microsoft.storage/storageaccounts?tabs=json
You have an Azure subscription that is used by four departments in your company. The subscription contains 10 resource groups. Each department uses resources in several resource groups.
You need to send a report to the finance department. The report must detail the costs for each department.
Which three actions should you perform in sequence?
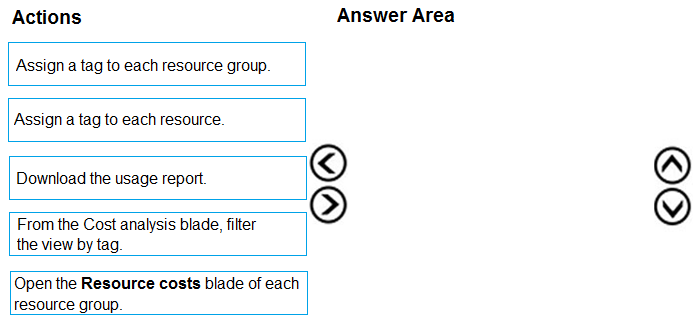
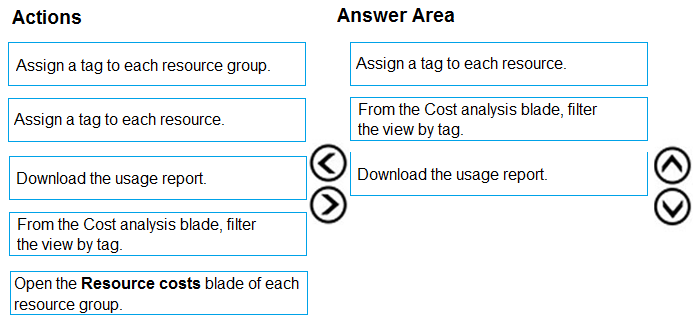
Box 1: Assign a tag to each resource.
You apply tags to your Azure resources giving metadata to logically organize them into a taxonomy. After you apply tags, you can retrieve all the resources in your subscription with that tag name and value. Each resource or resource group can have a maximum of 15 tag name/value pairs. Tags applied to the resource group are not inherited by the resources in that resource group.
Box 2: From the Cost analysis blade, filter the view by tag
After you get your services running, regularly check how much they're costing you. You can see the current spend and burn rate in Azure portal.
1. Visit the Subscriptions blade in Azure portal and select a subscription.
You should see the cost breakdown and burn rate in the popup blade.
2. Click Cost analysis in the list to the left to see the cost breakdown by resource. Wait 24 hours after you add a service for the data to populate.
3. You can filter by different properties like tags, resource group, and timespan. Click Apply to confirm the filters and Download if you want to export the view to a Comma-Separated Values (.csv) file.
Box 3: Download the usage report
Reference:
https://docs.microsoft.com/en-us/azure/azure-resource-manager/resource-group-using-tags
https://docs.microsoft.com/en-us/azure/billing/billing-getting-started
You have an Azure subscription that contains a storage account.
You have an on-premises server named Server1 that runs Windows Server 2016. Server1 has 2 TB of data.
You need to transfer the data to the storage account by using the Azure Import/Export service.
In which order should you perform the actions?
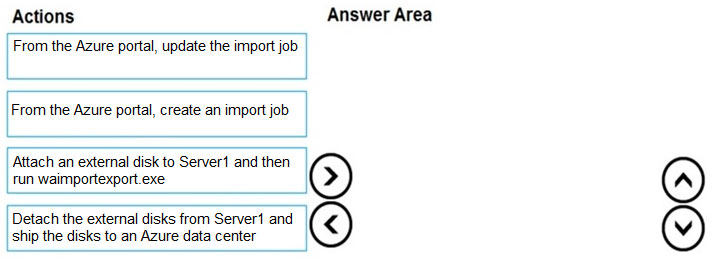
At a high level, an import job involves the following steps:
Step 1: Attach an external disk to Server1 and then run waimportexport.exe
Determine data to be imported, number of drives you need, destination blob location for your data in Azure storage.
Use the WAImportExport tool to copy data to disk drives. Encrypt the disk drives with BitLocker.
Step 2: From the Azure portal, create an import job.
Create an import job in your target storage account in Azure portal. Upload the drive journal files.
Step 3: Detach the external disks from Server1 and ship the disks to an Azure data center.
Provide the return address and carrier account number for shipping the drives back to you.
Ship the disk drives to the shipping address provided during job creation.
Step 4: From the Azure portal, update the import job
Update the delivery tracking number in the import job details and submit the import job.
The drives are received and processed at the Azure data center.
The drives are shipped using your carrier account to the return address provided in the import job.
Reference:
https://docs.microsoft.com/en-us/azure/storage/common/storage-import-export-service
You have an Azure subscription named Subscription1.
You create an Azure Storage account named contosostorage, and then you create a file share named data.
Which UNC path should you include in a script that references files from the data file share?
To answer, drag the appropriate values to the correct targets. Each value may be used once, more than once or not at all. You may need to drag the split bar between panes or scroll to view content.

Box 1: contosostorage
The name of account
Box 2: file.core.windows.net
Box 3: data
Reference:
https://docs.microsoft.com/en-us/azure/storage/files/storage-how-to-use-files-windows
You have an on-premises file server named Server1 that runs Windows Server 2016.
You have an Azure subscription that contains an Azure file share.
You deploy an Azure File Sync Storage Sync Service, and you create a sync group.
You need to synchronize files from Server1 to Azure.
Which three actions should you perform in sequence?
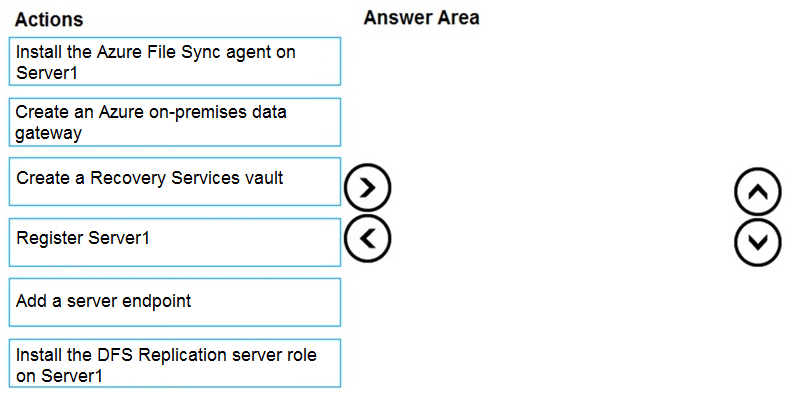
Step 1: Install the Azure File Sync agent on Server1
The Azure File Sync agent is a downloadable package that enables Windows Server to be synced with an Azure file share
Step 2: Register Server1.
Register Windows Server with Storage Sync Service
Registering your Windows Server with a Storage Sync Service establishes a trust relationship between your server (or cluster) and the Storage Sync Service.
Step 3: Add a server endpoint
Create a sync group and a cloud endpoint.
A sync group defines the sync topology for a set of files. Endpoints within a sync group are kept in sync with each other. A sync group must contain one cloud endpoint, which represents an Azure file share and one or more server endpoints. A server endpoint represents a path on registered server.
Reference:
https://docs.microsoft.com/en-us/azure/storage/files/storage-sync-files-deployment-guide
You onboard 10 Azure virtual machines to Azure Automation State Configuration.
You need to use Azure Automation State Configuration to manage the ongoing consistency of the virtual machine configurations.
Which three actions should you perform in sequence?
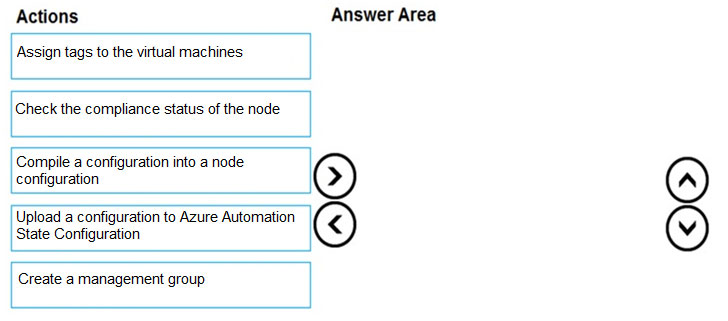
1: Upload a configuration to Azure Automation State Configuration
2: Compile a configuration into a node configuration
3: Check the compliance status of the node.
Step 1: Create and upload a configuration to Azure Automation
Step 2: Compile a configuration into a node configuration
Step 3: Register a VM to be managed by State Configuration
Step 4: Specify configuration mode settings
Step 5: Assign a node configuration to a managed node
Step 6: Check the compliance status of a managed node
Reference:
https://docs.microsoft.com/en-us/azure/automation/automation-dsc-getting-started
https://docs.microsoft.com/en-us/azure/automation/tutorial-configure-servers-desired-state
You have an Azure subscription that contains two virtual networks named VNet1 and VNet2. Virtual machines connect to the virtual networks.
The virtual networks have the address spaces and the subnets configured as shown in the following table.

You need to add the address space of 10.33.0.0/16 to VNet1. The solution must ensure that the hosts on VNet1 and VNet2 can communicate.
Which three actions should you perform in sequence?
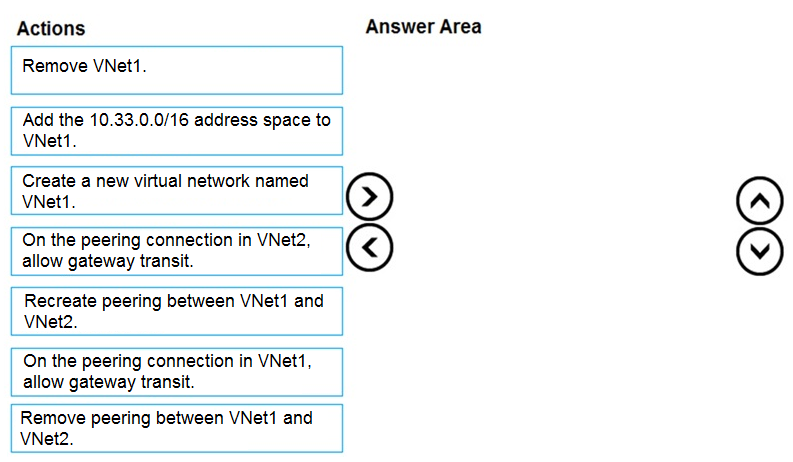
Step 1: Remove peering between Vnet1 and VNet2
You can't add address ranges to or delete address ranges from a virtual network's address space once a virtual network is peered with another virtual network. To add or remove address ranges, delete the peering, add or remove the address ranges, then re-create the peering.
Step 2: Add the 10.33.0.0/16 address space to VNet1
Step 3: Recreate peering between VNet1 and VNet2
Reference:
https://docs.microsoft.com/en-us/azure/virtual-network/virtual-network-manage-peering
You have an on-premises network that you plan to connect to Azure by using a site-so-site VPN.
In Azure, you have an Azure virtual network named VNet1 that uses an address space of 10.0.0.0/16 VNet1 contains a subnet named Subnet1 that uses an address space of 10.0.0.0/24.
You need to create a site-to-site VPN to Azure.
Which four actions should you perform in sequence?
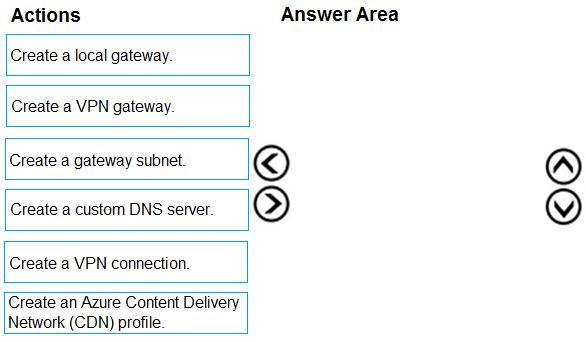
As per documentation:
1. Create a gateway subnet
2. Create a VPN gateway
3. Create a local network gateway
4. Create a VPN connection
5. Verify the connection
6. Connect to a virtual machine
Always work from the Azure side first, it's a dependency.
1 - Start with a Gateway subnet. You need the subnet in place first before you can associate a VPN gateway with it, which is what is created next.
2 - Create a VPN gateway. Associate the VPN gateway with the gateway subnet you created (there are other steps but for the sake of what is available for answers, the prem side is now configured)
Now for the premice side.
3. Create a local gateway. You need the local gateway in order to complete the tunnel, then you can create a VPN connection
Reference:
https://docs.microsoft.com/en-us/azure/vpn-gateway/tutorial-site-to-site-portal
https://docs.microsoft.com/en-us/azure/vpn-gateway/vpn-gateway-about-vpn-gateway-settings
https://docs.microsoft.com/en-us/azure/vpn-gateway/vpn-gateway-howto-site-to-site-classic-portal